Last May I went to the Copenhagen beer festival with friends. We had a great time at the festival and at Fermentoren, and I managed to stay in touch with some lovely people that we met from a Norwegian brewery called Nøgne Ø. The webshop manager told me that they actually sold beer kits. Brewing was something I’d vaguely considered trying for years, but I’d never really understood what exactly was involved, despite having spoken to a few homebrewers. That all changed when I got the complete starter kit from Nøgne Ø and brewed my first all-grain batch of beer.
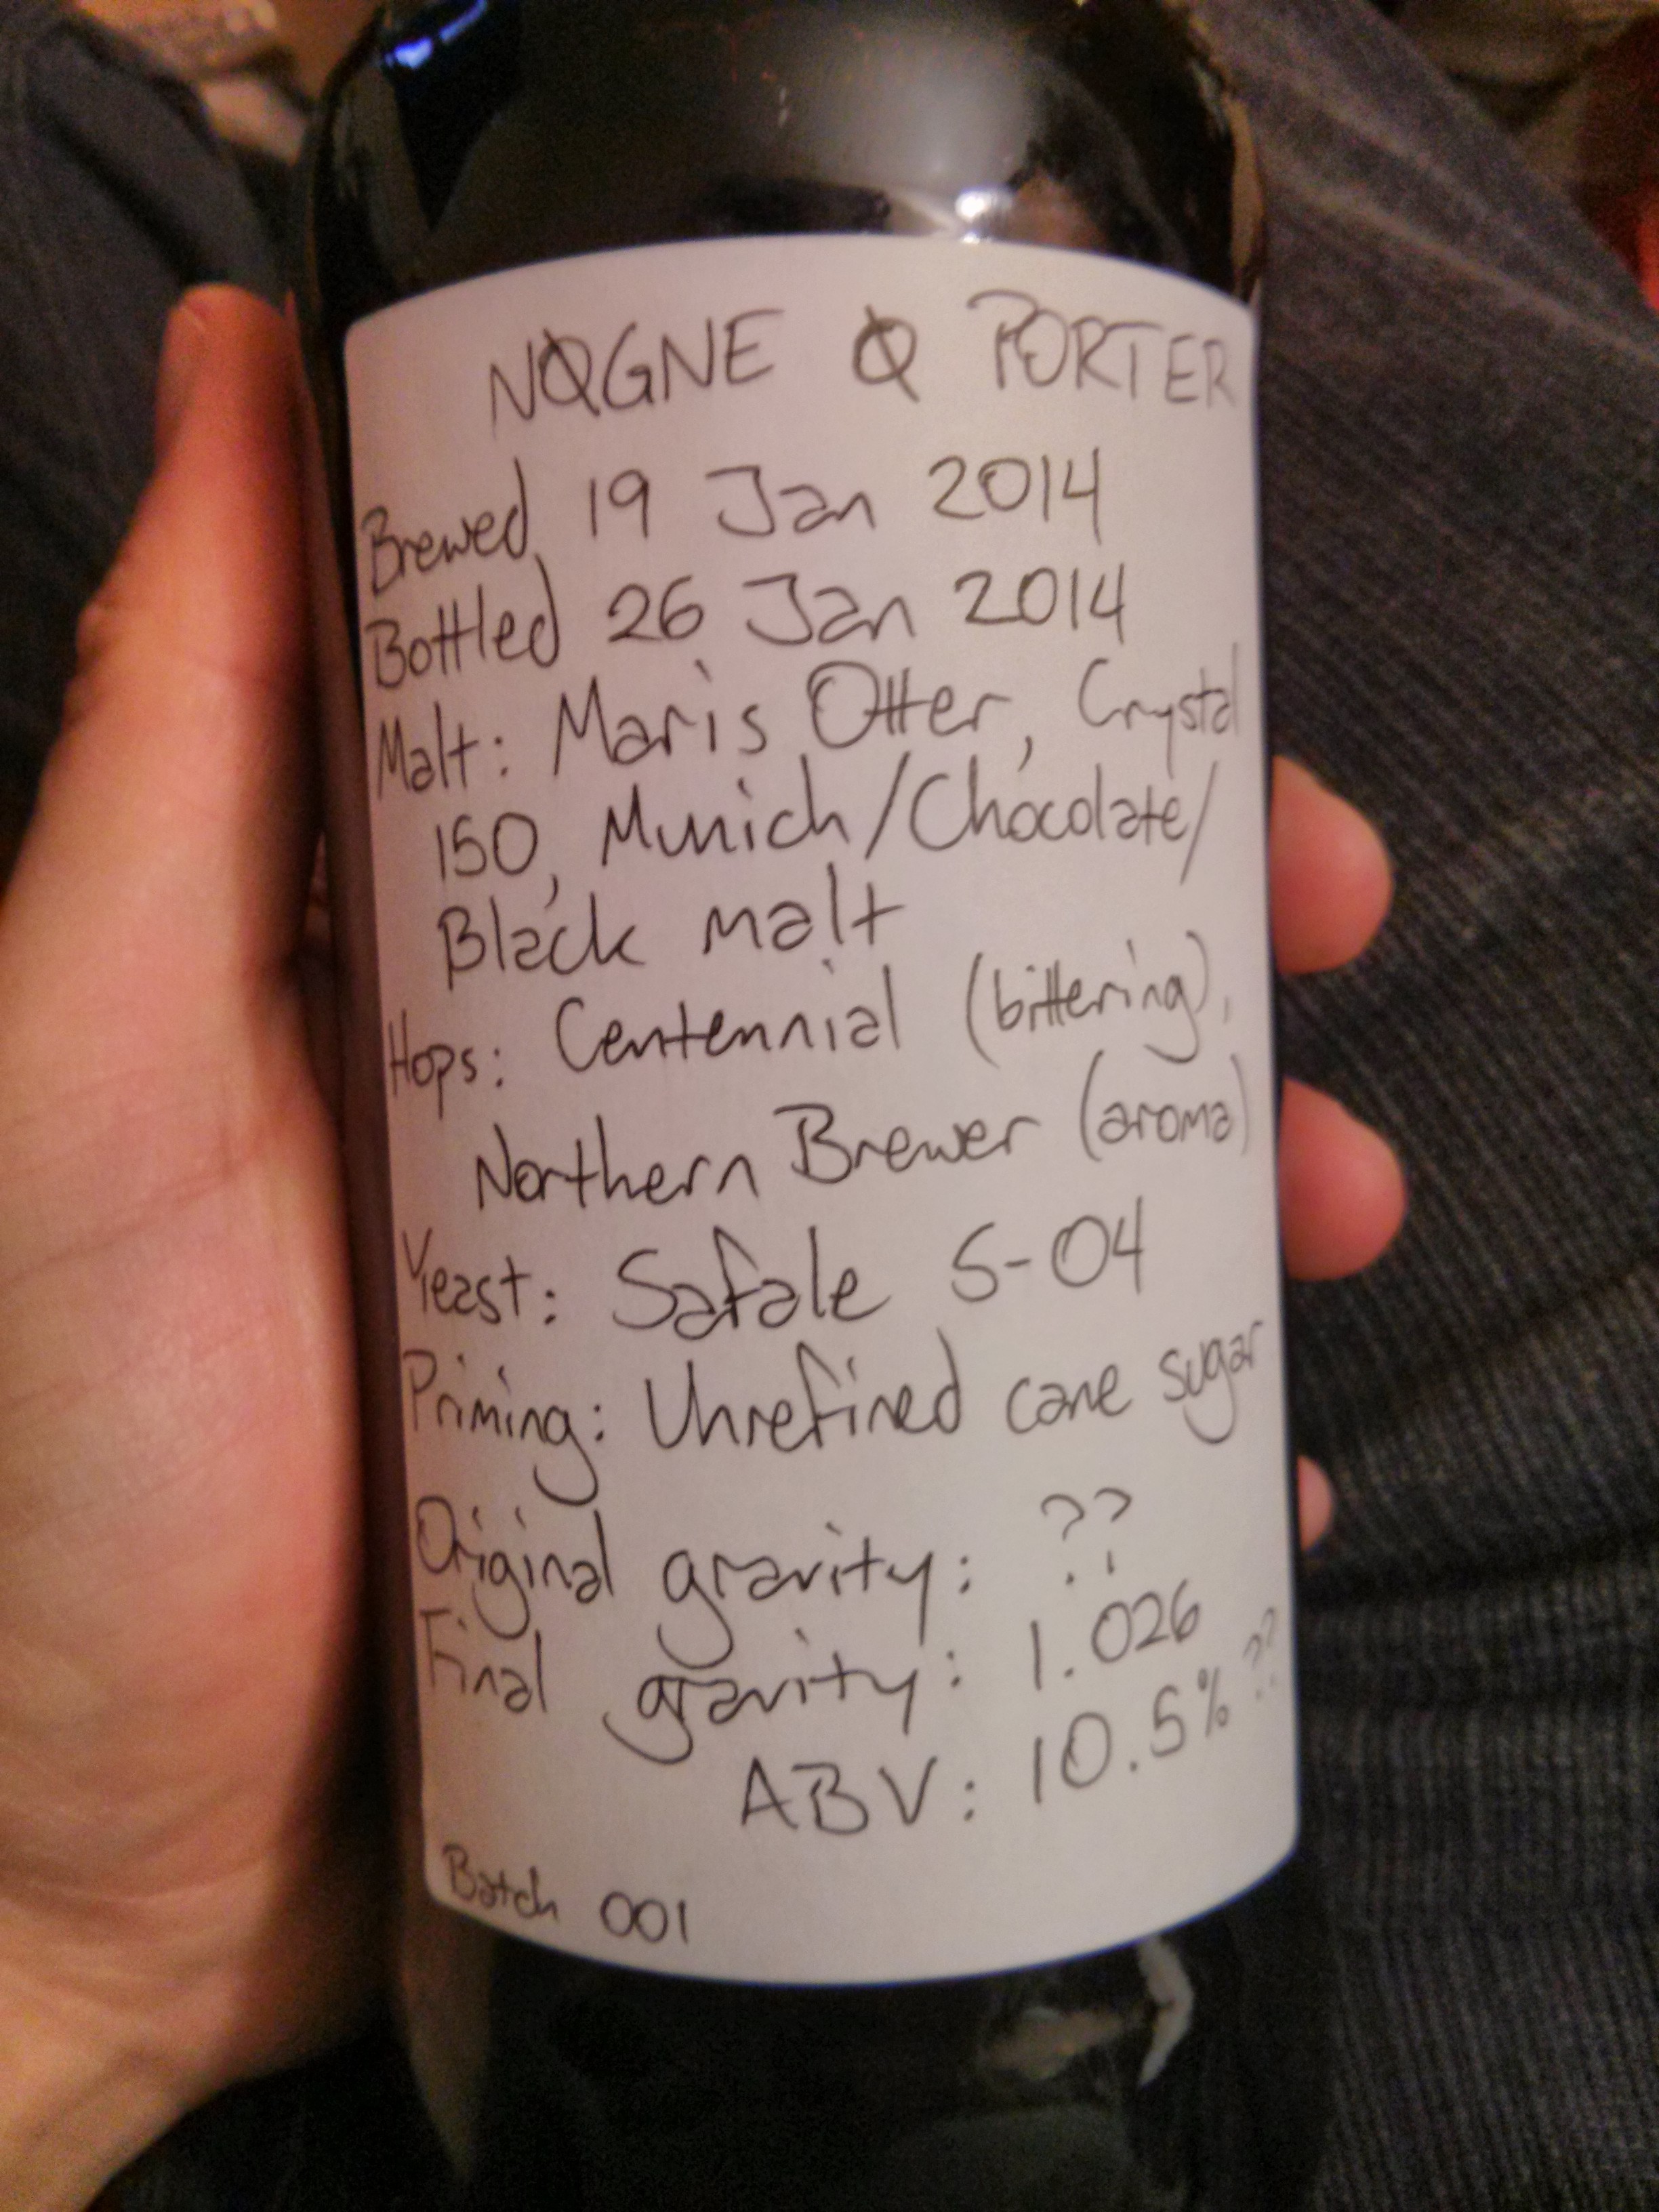
When I ordered the kit, I did not really know what was in it, nor did I understand that most beginners start with malt extract rather than from grain, but the instructions were actually quite simple and written for a total neophyte (albeit in Norwegian, which I worked out using a combination of an English copy of a recipe for one of their other beers, and Google translate). The complete starter kit includes a 1 imperial gallon (4.5L) glass carboy with rubber bung and airlock, siphon, thermometer, hydrometer and trial tube, and percarbonate-based disinfectant. It also includes a 4L beer kit, with the all-grain grist, bittering and aroma hop pellet packets, and a packet of dried Safale S-04 yeast. The great people at the brewery also sent me a few polo shirts, a bottle opener, and some Ø shaped stickers.
Things I had to acquire were a few pots (7.5L and 11L for the mash, boil, and sparge, and a 19L one to disinfect things in). I also got a funnel which can help with taking gravity readings using the hydrometer, an auto-siphon which obviates suction (and potential infection) and is required to move wort/beer, a 1L Pyrex cup for measuring, and StarSan which sanitizes more quickly than the PCB cleaner.
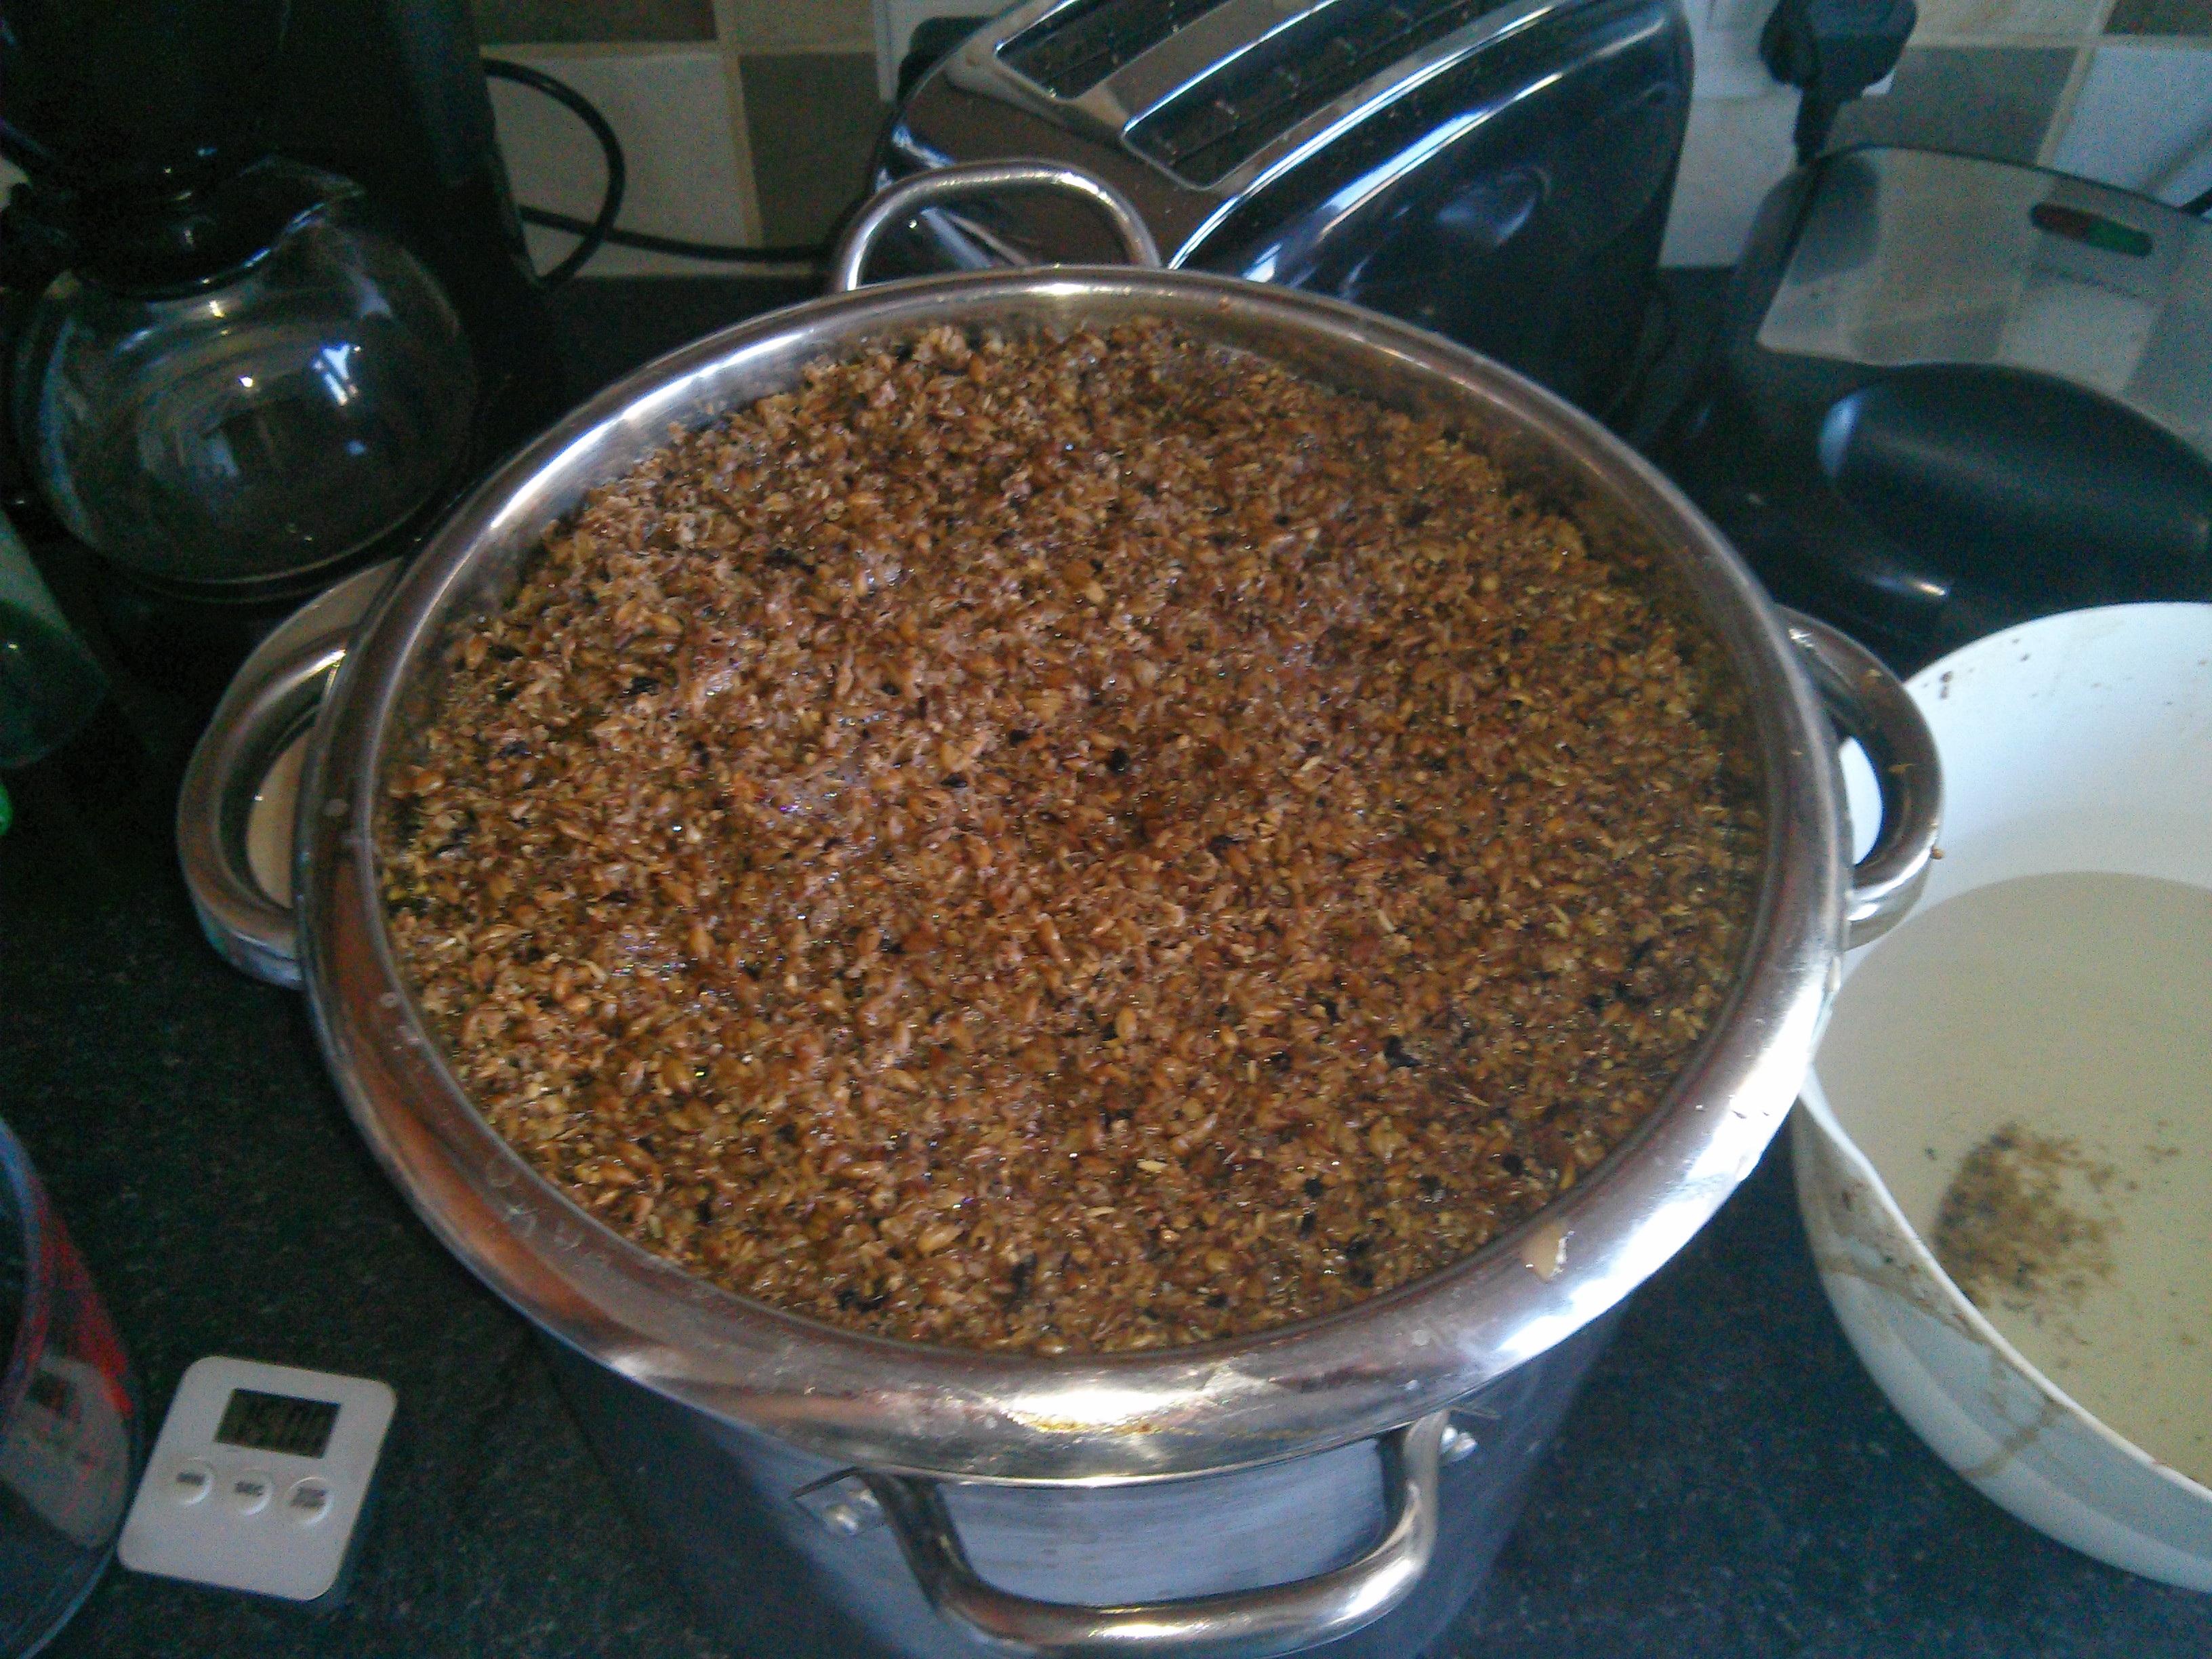
At the time I didn’t understand all the terminology, but I basically mashed in for 45 minutes at 65 C, then mashed out at 72 degrees for another 15. I then sparged put the mash into a big colander over another pot according to the instructions, so no mash tun or lauter tun was needed (not that I knew what these were at the time). I ran the wort through a few times until it ran clear. I then sparged with another 4L of 77 degree water.
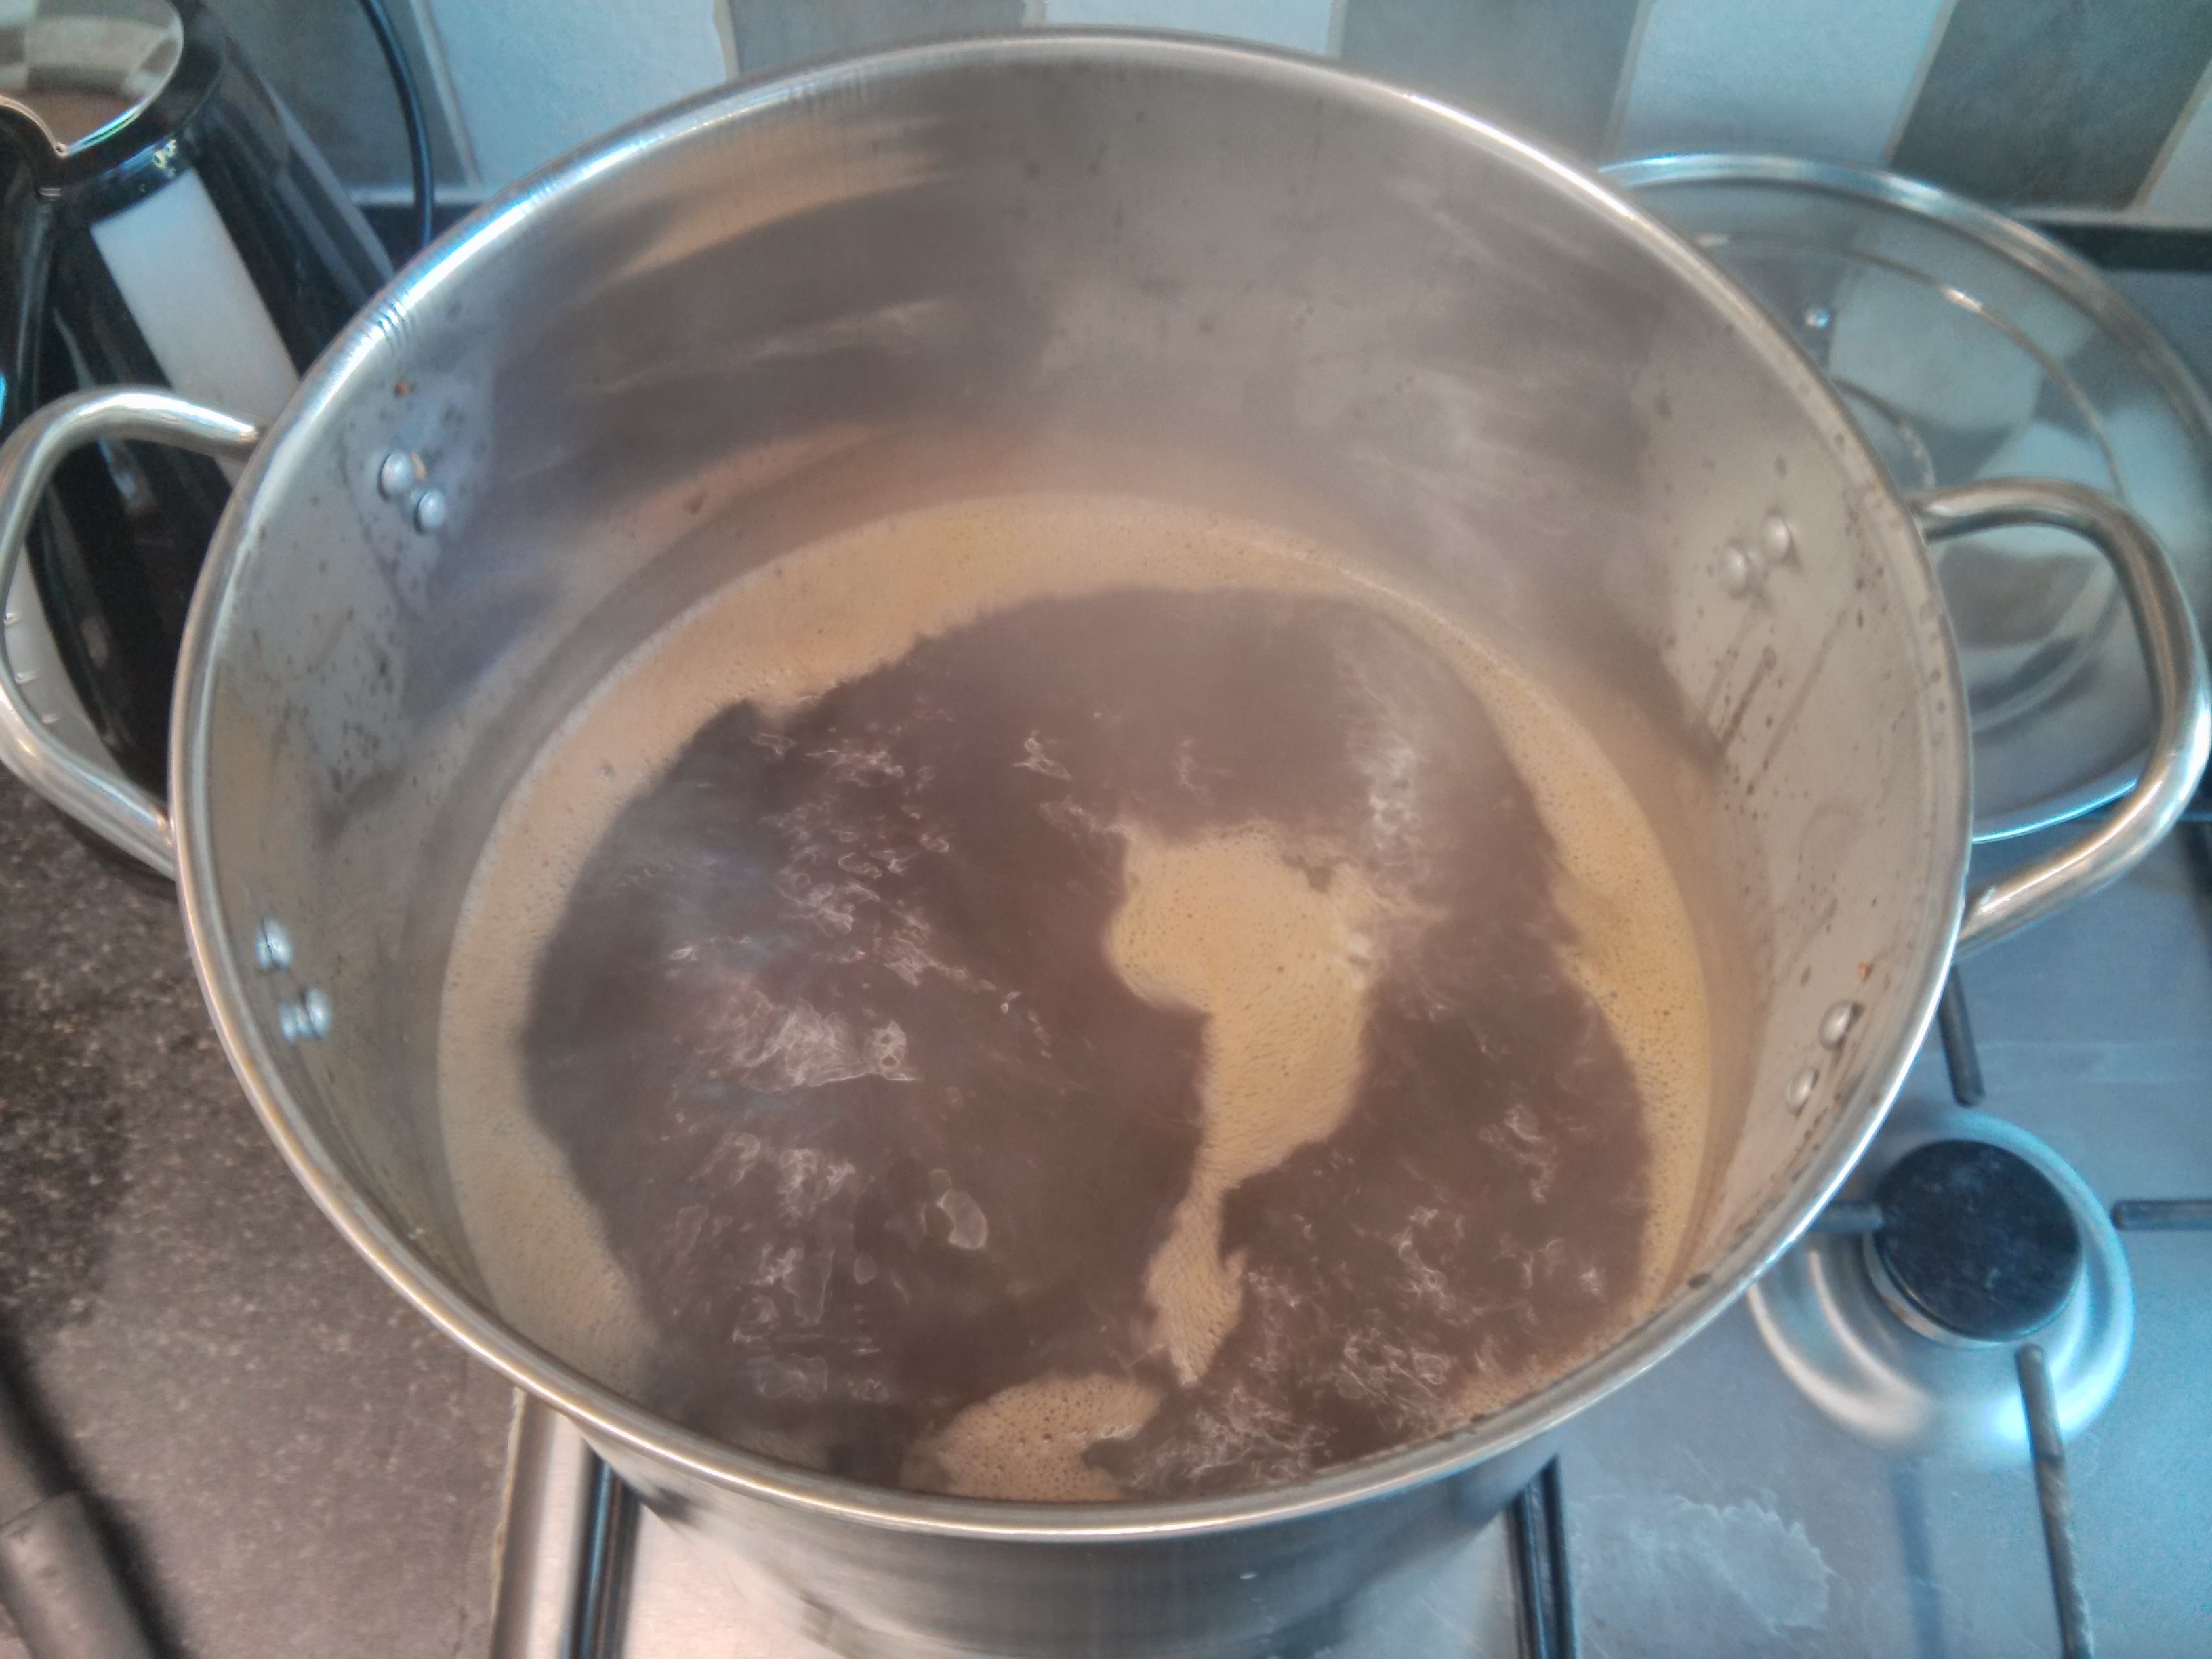
The boil went smoothly. The “hot break” was unspectacular, and unlike a few later attempts I came nowhere near a boil over. I added the hop pellets at the specified times, and at the end of the boil cooled using a lot of ice in the sink. The hops smelled much stronger than I was expecting!
I did make some mistakes on brewday. First, I broke my hydrometer before I could take any gravity readings. They are made of thin glass and very fragile and while sanitizing it with other equipment I snapped it in the pot of disinfectant. This meant I couldn’t take an original gravity reading, which would have allowed me to correct for the far too high gravity that I ended up with. The result was that I wound up with much less wort than I should have—I’m guessing at pre-boil I had somewhere around 4L instead of 5L, and I’m guessing that just over 3L went into the fermenter. I did not understand enough to know that I could add boiled-then-cooled water at the point of putting it into the fermenter, so I just accepted the lower volume.
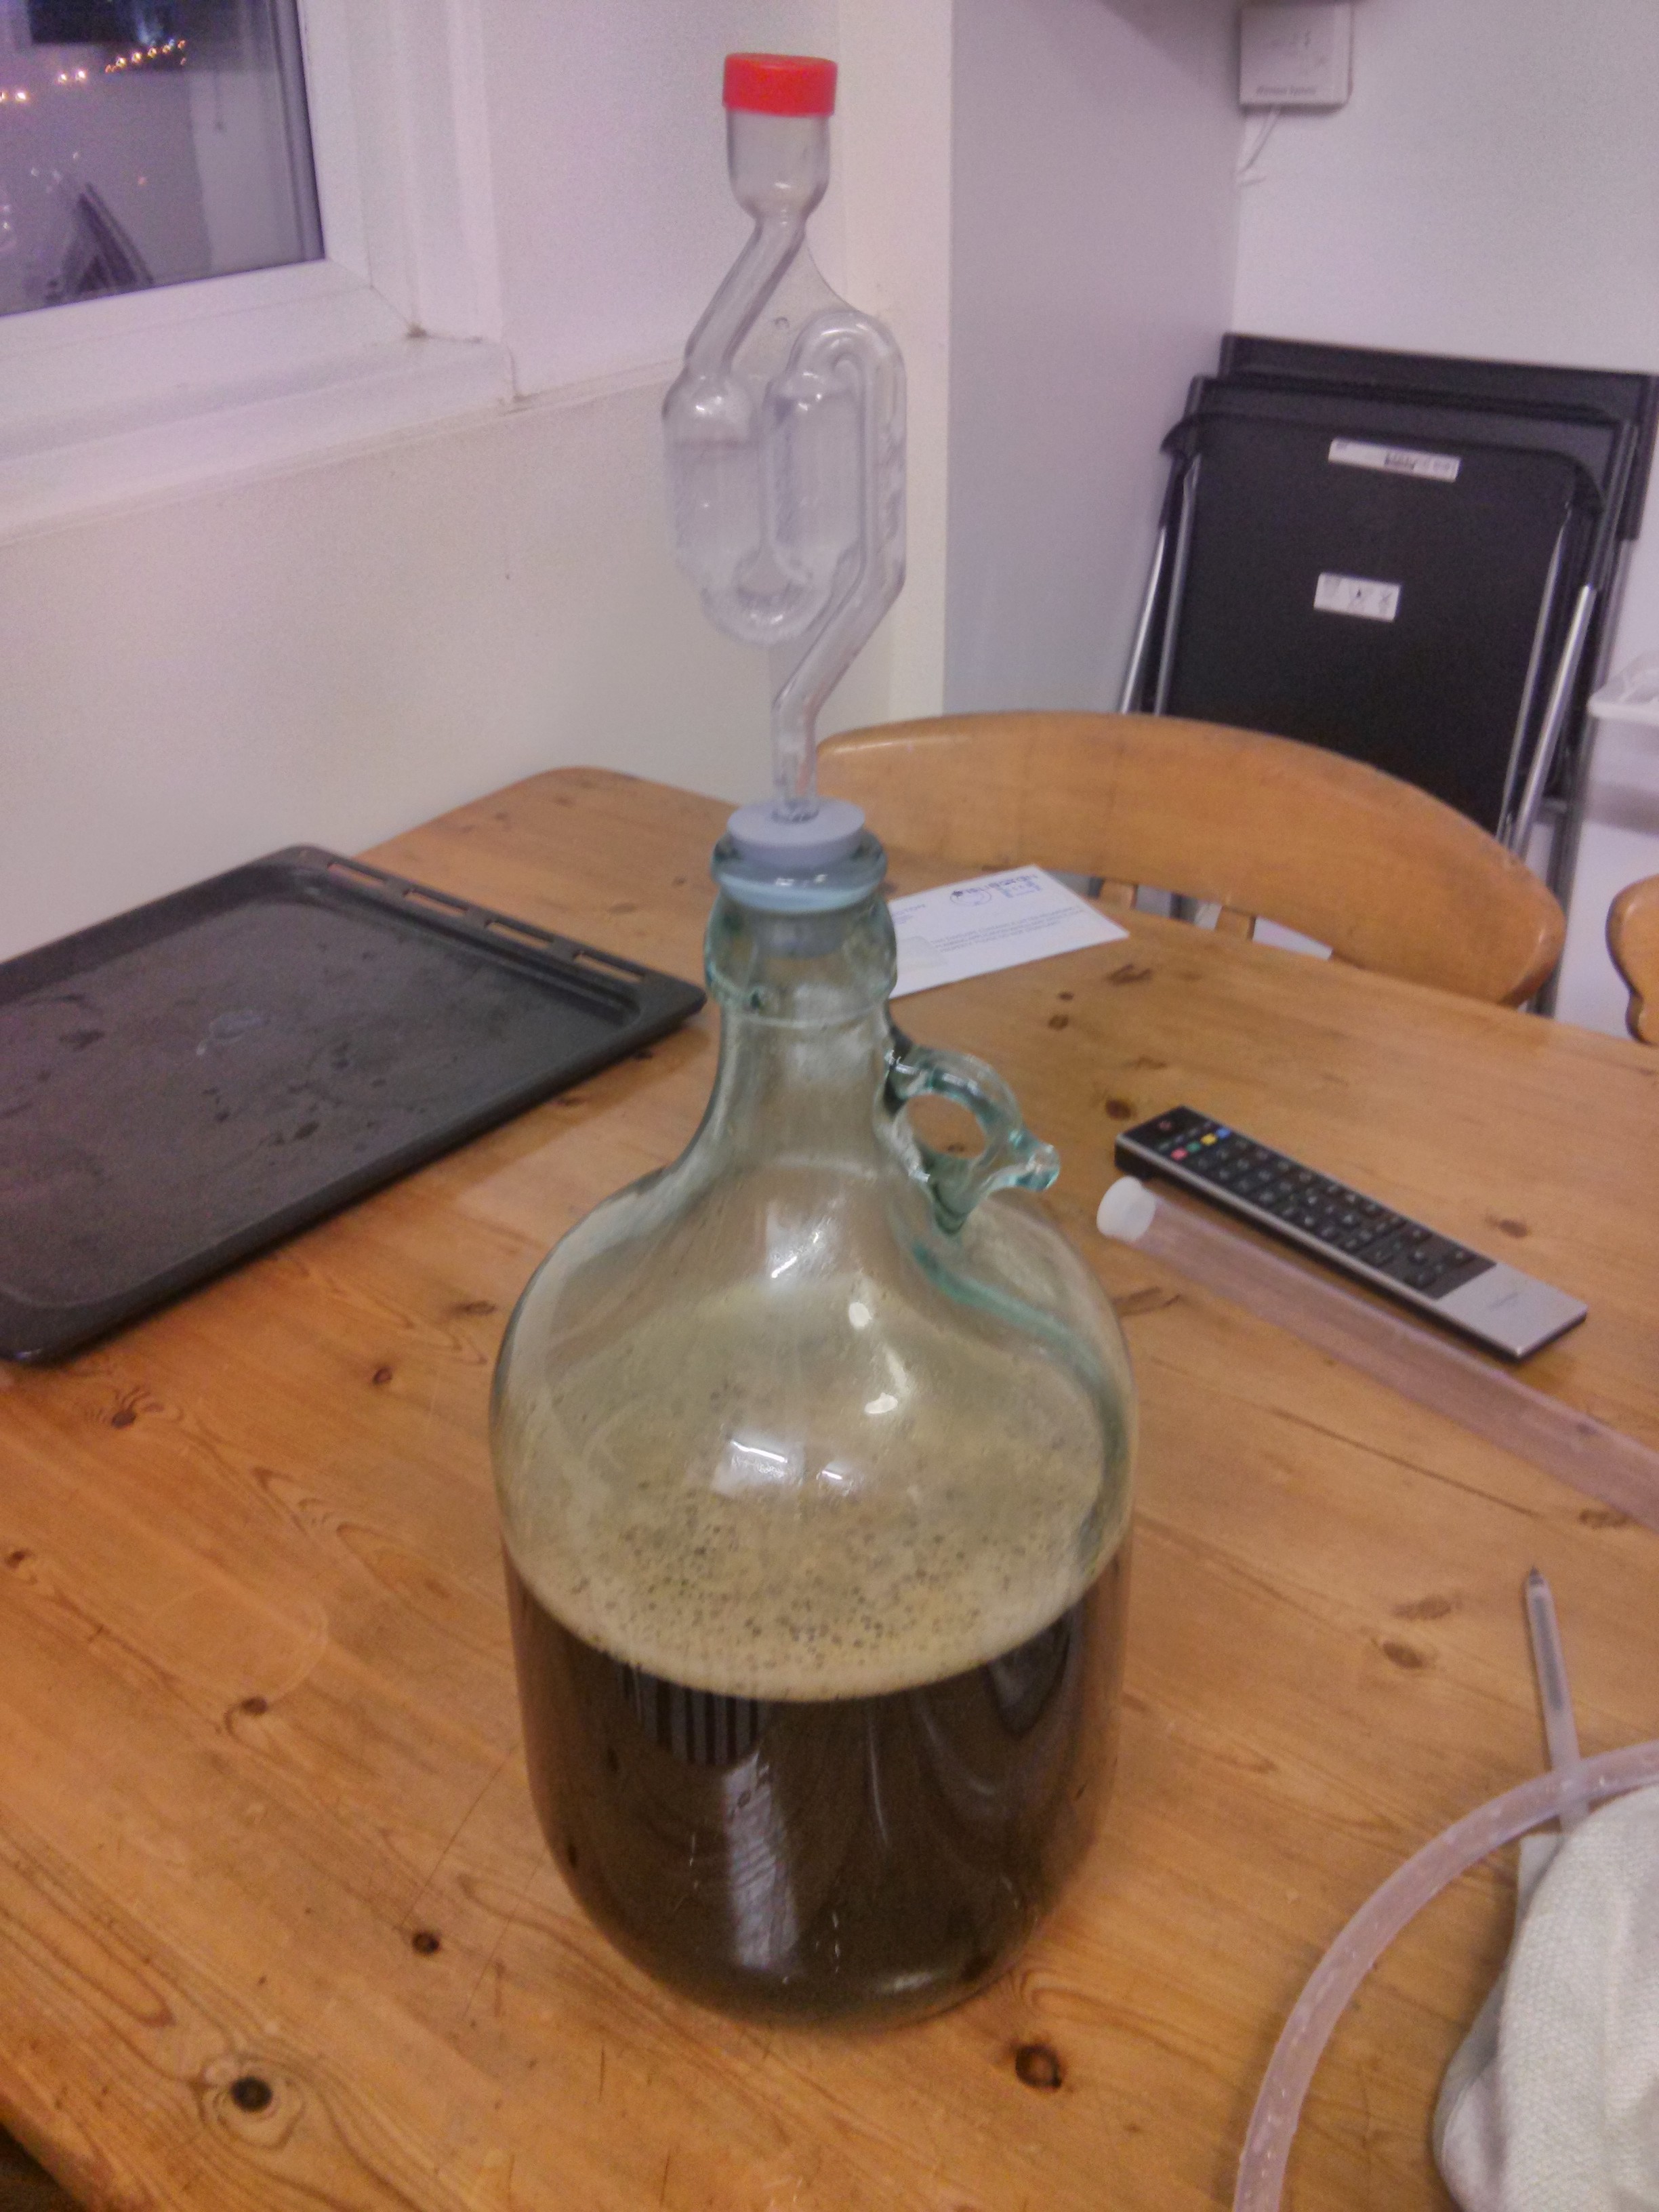
While cooling the wort, I also managed to stir up some of the sediment at the bottom, and rather than siphoning to the fermenter I actually just poured it through a funnel. Apparently sediment (spent hops, cold break, hot break) can contribute off-flavours or affect clarity, but in a beer this strong and this dark I doubt it matters much. But in the future I will be siphoning and maybe using finings for lighter beers. I got a bit confused because once the wort is cool and off the sediment, you do want to agitate it in order to aerate it before pitching the yeast.
My third mistake actually complemented first mistake, in that I probably overpitched yeast. The instructions called for 1/4 of the packet of dried yeast. First, I made a yeast starter at the start of the day. I used sugar rather than wort, since being used to baking yeast I didn’t understand that beer yeast prefers/needs maltose. I also absent-mindedly used the whole packet of yeast. The starter rose very quickly in my warm kitchen, so I might have been overpitching by quite a bit. Luckily, when fermenting very dark, very high gravity beer (which I had accidentally brewed), you want to have a lot of very active yeast. Within a few hours the bubbles had started and fermentation was underway, so in a way my two mistakes cancelled each other out.
This stayed in the carboy for one week. It did blow the top off the airlock at one point but the airlock never blocked, thankfully. I now understand that the beer can sit on the yeast for quite a while (even up to three or four weeks) without ill effects, and some people say that this should be done for strong, dark beer. However the instructions said that fermentation would be done in 3-7 days, as you want the yeast to still be active for the carbonation step. Rather than recommending multiple gravity readings, the instructions just said it was probably done when the airlock bubbles were more than fifty seconds apart. By the sixth day it was about a minute between bubbles, and by the seventh it was quite calm, so I bottled that afternoon.
Bottling went reasonably smoothly. I racked into a secondary (really just a pot) into which I’d put about 18g of unrefined cane sugar syrup that I had boiled then cooled. Bottling with the autosiphon and no racking cane meant a few drips but I just about filled six 500 mL bottles. I now know this amount of sugar means about 2.2 volumes of CO2 of carbonation which is on the low side for this style, but I was (probably unecessarily) a bit scared of the dreaded “bottle bombs” so I kept it a bit low.
The alcohol percentage (ABV) is harder to judge, as I don’t know what the original gravity was. The beer was supposed to be about 7%, but my volume was about a litre short at the end. My final gravity was 1.026. Using BeerSmith, my original gravity was likely between 1.098 (assuming I got roughly the estimated mash efficiency of 76.5%) and 1.115 (assuming I got the estimated brewhouse efficiency of 72%). This puts my alcohol between 9.9% and 11.9%. When I tasted it I guessed it at around 10.5% but a friend thought it was higher. In any case I have succeeded in making an incredibly strong beer, and I’m very proud to have done so. I tasted the beer around a week after bottling, and this was definitely not long enough as it tasted unfinished. I expect some carbonation may still be occurring, and from what I’ve read a beer this big could well improve for several months.
I learned a lot in my first brewing endeavour. I’ve now got a Scottish 60 Shilling Ale that’s just finishing up its primary fermentation. In this beer I used an extract kit with speciality grains to determine how much easier this was. It certainly did eliminate some steps, but I think going forward I’d like the freedom and flexibility of brewing with all grain. In one-gallon batches, it’s really not too much work, and London water seems up to the task at least of brewing porter from all grains.
No Trackbacks.